Detect faces using facenet in Python
May 1, 2017
Edit 2017 September 8, I fixed the images BGR issue as recommended by Jason Taylor
This post will show how to detect faces using the facenet library, as it is not exactly clear from the wiki on how to use functions within the library. I’ve found that the facial detection implementation in facenet to be much better than the standard OpenCV haarcascade frontalface detection method.
The facenet library is a TensorFlow implementation of the FaceNet paper. You can download some of the pre-trained models, which have an accuracy of 0.993 with the LFW dataset. This accuracy is certainly impressive. So what are you waiting for, go clone and fork this library!
$ git clone https://github.com/davidsandberg/facenet.git
And now install.
Edit: It appears that setup.py isn’t configured properly. Rather add facenet/src to your PYTHONPATH.
First you must be sure that you have all have installed all of the Python requirements which are: tensorflow==1.0, scipy, scikit-learn, opencv-python, h5py, matplotlib, Pillow, requests, and psutil. I’m running the latest tensorflow=1.1.0-rc2 and facenet appears to be working with no problems. Now you should validate facenet using the LFW dataset to verify that your installation is working properly. You can follow these instructions.
The facenet library uses a pre-trained MTCNN to detect faces. This appears to be a really good facial detection implementation. With my particular dataset, the MTCNN facial detection implementation is working much better than the standard haarcascade frontalface detection typically done with OpenCV.
Here is a simple script to detect faces using the facenet implementation:
#   import facenet libraires
from __future__ import absolute_import
from __future__ import division
from __future__ import print_function

from scipy import misc
import tensorflow as tf
import os
import align.detect_face

#  import other libraries
import cv2
import matplotlib.pyplot as plt

#   setup facenet parameters
gpu_memory_fraction = 1.0
minsize = 50 # minimum size of face
threshold = [ 0.6, 0.7, 0.7 ]  # three steps's threshold
factor = 0.709 # scale factor

#   fetch images
image_dir = 'presidents/'

#   create a list of your images
images = os.listdir(image_dir)

#   Start code from facenet/src/compare.py
print('Creating networks and loading parameters')
with tf.Graph().as_default():
    gpu_options = tf.GPUOptions(
        per_process_gpu_memory_fraction=gpu_memory_fraction)
    sess = tf.Session(config=tf.ConfigProto(gpu_options=gpu_options,
        log_device_placement=False))
    with sess.as_default():
        pnet, rnet, onet = align.detect_face.create_mtcnn(
            sess, None)
#   end code from facenet/src/compare.py

    for i in images:
        img = misc.imread(os.path.expanduser(image_dir + i))
        #   run detect_face from the facenet library
        bounding_boxes, _ = align.detect_face.detect_face(
                img, minsize, pnet,
                rnet, onet, threshold, factor)

        #   for each box
        for (x1, y1, x2, y2, acc) in bounding_boxes:
            w = x2-x1
            h = y2-y1
            #   plot the box using cv2
            cv2.rectangle(img,(int(x1),int(y1)),(int(x1+w),
                int(y1+h)),(255,0,0),2)
            print ('Accuracy score', acc)
        #   save a new file with the boxed face
        misc.imsave('faceBoxed'+i, img)
        #   show the boxed face

        plt.figure()
        plt.imshow(img)
        plt.show()
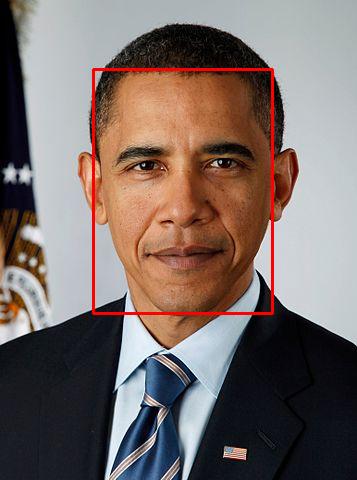
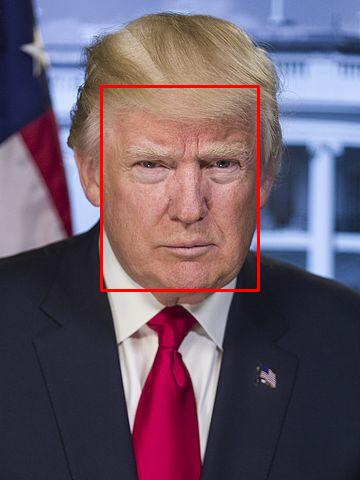
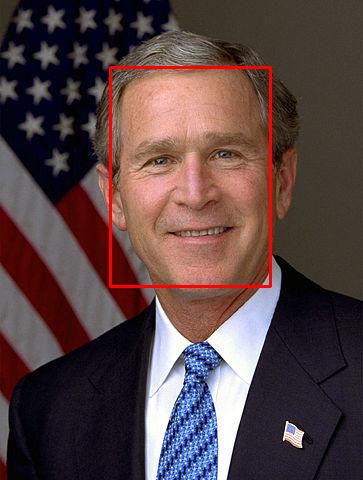
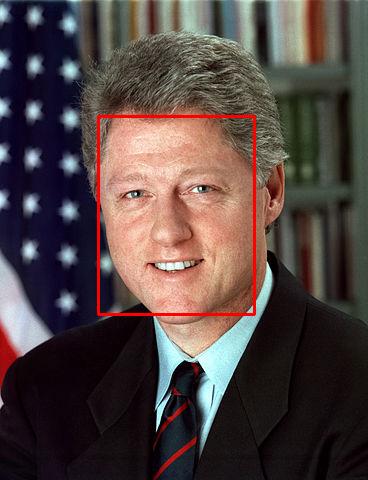
The long lines may mess up your code if you copy and paste from the above source. So I recommend that you download faceDetect.py and the presdients folder of images from here.
Now just run faceDetect.py to watch the MTCNN box the location of faces around the sample presidents.
$ python faceDetect.py
The code should create the following images.